Pages

Saturday, July 30, 2011

Very Strawberry Shortcake


I was in the mood for dessert for this recipe. Looked everywhere but everything was either crazy unhealthy, or would turn out to be crazy expensive. Then I stumbled on this little beauty in the April 2010 issue of Food Network Magazine. My heart soared when I read through the recipe, then I ran to get the ingredients as soon as I could.

The only thing is that the portion size is small. Of course, no matter how healthy I want to be, I wanted a gigantic shortcake with little calories. I'm thinking like a crazy person now! Even though it was small, it was still satisfying. The biscuit was soft, the strawberries were sweet, and the whipped cream was delectable as always. If you are looking for a small low calorie dessert...look no further! :)

This is a Splenda recipe featured in the magazine, so it is based around this no-calorie sweetener. 
I love the taste of the strawberries after they soaked in the balsamic vinegar. Yum!


These were a little smaller than the 1/2 inch the recipe called for...oops.

Since I made the biscuits a little small, I just used two to make the shortcake.

Very Strawberry Shortcake
Food Network Magazine--April 2010 Issue


Ingredients:
Filling:
3 cups fresh strawberries
2 tablespoons Splenda, No Calorie Sweetener, Granulated
2 teaspoons balsamic vinegar

Shortcake:
2 1/2 cups reduced-fat biscuit mix
1/3 cup Splenda, No Calorie Sweetener, Granulated
1 cup plain fat-free yogurt
1 1/2 teaspoon vanilla extract

Fat-free whipped topping thawed
Mint Sprigs (optional)

Directions:
Filling:

  1. Stir together strawberries, 2 tablespoons Splenda and balsamic vinegar; let stand 1 hour, stirring occasionally.
Shortcake:
  1. Preheat oven to 425'
  2. Combine biscuit mix and 1/3 cup Splenda in a large bowl.
  3. Stir together yogurt and vanilla; add to dry ingredients, stirring just until moistened.
  4. Turn dough out onto a lightly floured surface, and knead 3 or 4 times. Pat dough to a 1/2 inch thickness. Cut with a 2 1/4 inch biscuit cutter, reusing dough scraps, if necessary. Place shortcakes on an ungreased baking sheet. Bake 12 to 15 minutes.
  5. Serve warm with sliced strawberries. Garnish, if desired.
Makes 12 servings.
Nutrition: (1 shortcake with 1/4cup of strawberries) Calories 120, Fat 10g, Cholesterol 0mg, Carb 25g, Fiber 2g, Protein 4g, Sugar 6g

Monday, July 25, 2011

Turkey Sloppy Joes


This last week was awesome, but the last few days have been tough. I knew it would be hard to come back home, so I was looking forward to getting back into the kitchen. Even with all of my enthusiasm to cook, I couldn't decided what to make. I was at the store with two different shopping lists for two different recipes and I ignored both of them. It's not like I didn't want to make them, because they were recipes I have been looking at for a few weeks, I just didn't know what I wanted. Finally, today I just made a decision on a completely different recipe and it worked out lovely.

All I had to do was get back into my routine. One new thing to my routine is a phone call with an awesome person who drives me to be a better person! :)

Ignore the picture in the book, that is something completely different! :)
One of my favorite cookbooks!


One pot meal! I love those!


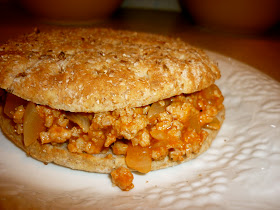
Paired with a Sandwich Thin, this makes this crazy healthy and delicious. Although, this would also be yummy on a large bun!!

Turkey Sloppy Joes
Betty Crocker's Healthy New Choices


Ingredients:
1 pound ground turkey breast
1 medium onion, chopped (1/2 cup)
1 can (10 3/4 oz) reduced-fat condensed tomato soup
2 teaspoons Worcestershire sauce
3 drops red pepper sauce (This was from a different recipe in the book but I just used a hot pepper sauce I had in my fridge.)
6 hamburger buns, split

Directions:

  1. Cook turkey and onions in a 2-quart saucepan over medium-high heat, stirring occasionally, until turkey is no longer pink; drain.
  2. Stir in remaining ingredients except buns. Cook, stirring occasionally, until hot. Fill buns with turkey mixture.
Makes 6 servings
Nutrition: (not including bun) Calories 240g, Fat 4g, Cholesterol 50mg, Sodium 482mg, Protein 22g


Here is another blog that would intrigue you! Check out my brother's new blog Life in a Keg Shell!

Sunday, July 17, 2011

Easy Marinara Sauce


Since my last recipe was so time consuming, I wanted to do something a bit simpler this time. Well, this recipe had the word easy in the title so I was instantly drawn to it. Also, I have always just opened up a can of marinara sauce and have never gone through the work to make my own. Now I can say the opposite!
I made this a few days ago, but waited to post it since I will be leaving tomorrow at 5am to go watch my soldier graduate! Don't know when I'll make something next and didn't want the gap to be too long. :)

This recipe is healthy, easy, and overall delicious! Paired with Whole Grain pasta this dish made for a low calorie, yet flavorful dinner!

I didn't take too many pictures with this recipe because there weren't that many opportunities, it's that easy. :)

Easy Marinara Sauce
Women's Day Special - Eating Light Volume XX - Issue 1
Ingredients:

1 large onion, finely chopped
4 cloves garlic, finely chopped
2 tbsp balsamic vinegar
2 cans (28 oz each) no-salt-added crushed tomatoes
1 tbsp dried Italian herb blend (or 2 tsp dried basil plus 2 tsp dried oregano)
1/2 tsp crused red pepper flakes
Salt and pepper to taste

Directions:
  1. Liberally coat a 5-quart saucepan with cooking spray and heat over medium heat.
  2. Add the onion and cook, stirring occasionally, just until beginning to soften, 4 to 5 minutes.
  3. Stir in the garlic and balsamic vinegar and cook for 1 minute.
  4. Add the tomatoes, Italian seasoning and crushed red pepper, and bring to a boil. Reduce heat and simmer, covered, for 30 minutes. Season with salt and pepper to taste. 
Makes 14 servings (serving size 1/2 cup)
Nutrition: Calories 51, Protein 2g, Carbs 9g, Fiber 2g, Fat 0g, Sodium 20mg

Ronzoni Heathy Harvest Pasta - Whole Grain Rotini (Serving size: 2 oz [3/4 cups])
Nutrition: Calories 180g, Fat 1g, Cholesterol 0mg, Sodium 0mg, Carbs 41g, Protein 7g

Thursday, July 7, 2011

Cheese Tamales


I have never eaten a tamale before this weekend. I know, I'm crazy. Even though I have never had one, I have been craving one for weeks now. Again, CRAZY! So, to finally curb this craving and to finally eat a tamale I found this recipe in one of my cookbooks and set to work.

Making tamales is a long process, and the best way is to make many at a time and freeze the ones you won't eat in the next 3 days. I only made about 20 this time, and yes I probably should have made more, but since this was my first time I didn't want to go to far. The recipe was for cheese tamales, but I added a couple green chilies to each. Next time I will go for a meat filling!

Make sure you dedicate a couple hours to this, you want them to be perfect!

I doubled the recipe from the cookbook.

The sink was the largest thing I could find to soak the husks! 
Roasting the chilies makes the flavor intense. After roasting till the skin is black, place in a ziplock bag and allow the to "sweat" for 10 minutes. The skin should come off easily, if not take off skin under running water. Pull the chilies with fingers into long strips.


To fold them with an open end: Place the cheese and chillies (if desired) on top of the masa mixture.


1. Fold over the side with the masa and tuck under the dough and gently pull till tight.
2. Take the end and fold into the center.


 3. Carefully fold over the remaining side, making sure the top is even and the masa is secured.
4. Tie the tamale with string or a long strip of cornhusk.
My make shift steaming basket, and yes I did secure it with zip ties. :)


Cheese Tamales

Ingredients:
10 large dried cornhusks or waxed paper
6 tbl vegetable shortening, at room temperature
2 cups masa harina
1 tsp salt
1 tsp baking powder
1-1 1/4 cups warm light vegetable shortening
7 oz fresh white cheese, such as feta, roughly chopped* 

*I cut my cheese into rectangles, they seemed easier to fold into the masa. I also used pepper jack cheese.

Directions:
  1. Place the corn husks in a bowl and pour over bowling water to cover. Soak for 30min, until husks become soft and pliable. Remove from the water and pat dry with a clean dish towel.
  2. Meanwhile, put the vegetable shortening in a large mixing bowl and beat with an electric whisk until light and fluffy. Test by dropping a small amount of whipped shortening into a cup of water. If it floats, it is ready to be used.
  3. Combine the masa harina, salt, and baking powder in a separate bowl. Gradually add to the shortening, beating in 3 tablespoons at a time. As the mixture begins to thicken, start adding the stock, alternating the dry mixture and the stock until both have been used and the mixture is light and spreadable. If it feel tough, or dry to the touch, beat in a little more warm water, but don't add more stock, as the dough will already be flavorsome enough.
  4. To assemble, lay the prepared corn husks on a board and spread about one-tenth of the masa mixture in the center of each, leaving a small border at either side, with a large border at the top and bottom. *There are many ways to fold tamales. See above for how I assembled them.
  5. Place a piece of cheese in the center of the masa mixture. Fold one of the longer lengths of husk over, so that it covers the filling, and then repeat with the opposite end. Close the package by folding over the two remaining sides, to make a neat parcel. Secure the tamales by tying each one with a piece of string or strip of corn husk.
  6. Pile the tamales in a steamer basket placed over simmering water. Cover and steam for 1 hour. Check the level of the water occasionally, topping up if necessary. The tamales are ready when the dough comes away from the corn husk cleanly. Allow to stand for 10 minutes, then serve.
Makes 10 tamales.

Sunday, July 3, 2011

Cinnamon Toast Rolls


Okay so this is not from a cookbook or cooking magazine. Would you call this cheating? Oh well! I stumbled across these online a few weeks ago and have been wanting to try them. They seemed really easy so I thought I would share, even though they aren't part of the challenge. Later on I will give you a sneak peak of the other recipe I did today that is actually part of the challenge. ;)

Seriously, this is all you need! White bread would work just fine as well. Also, the more bread you use, the more butter you will need!


The outside gets crispy while the middle remains gooey and delicious!

Cinnamon Toast Rolls

Ingredients:
Dozen or so slices of soft bread
Melted butter (amount dependent on amount of bread)
Cinnamon and Sugar combined

Directions:
  1. Preheat oven to 375'
  2. Cut the crusts off of the bread.
  3. Roll them very thin.
  4. Spread each side with melted butter.
  5. Sprinkle evenly with cinnamon and sugar.
  6. You can roll them up or fold them into a triangle, pretty much anyway you choose.
  7. If rolled up, place in mini muffin pan. If folded, place on baking sheet.
  8. Bake for 10-15 min, depending on amount, till almost golden brown and crispy. 
  9. Remove from pan and let cool a little before serving.
  10. If desired top with a glaze made from powdered sugar moistened with a little milk. (I didn't have any powdered sugar so I had to go without. Still, very yummy!)
These freeze well if you want to make many! To reheat, place briefly in microwave to thaw, then bake at a low temperature (250' or 300') till crispy. Also, you can reheat them in foil in the oven and skip the microwave, this may take longer.