Wednesday, November 28, 2012

Low Fat Tamale Pie


Looks like I'm taking a break from all the pumpkin to get me a little bit of mexican. I love mexican food! Probably because I am half mexican, and I have been around homemade tortillas and tamales my entire life. I previously posted a cheese tamale recipe and believe me handmade tamales are definitely the way to go. Although, they do take a lot of time. You really have to set aside an entire day. I have seen tamale pie recipes everywhere and I was curious. I also had my mother asking me almost every week to make this. So I finally caved and decided to get it a try.

Compared to the traditional way to make tamales this was so simple and very delicious. You still get that great flavor of homemade tamales, but without all the time and still healthy for you!


Be very patient when mixing the cornmeal. Keep stirring so it doesn't burn and eventually it will thicken up. I didn't have my burner up high enough so I was standing there stirring for a while before I realized it was futile unless I turned up the heat. :)


Low Fat Tamale Pie
lowfatcooking.com

Ingredients:
Filling:
2 teaspoon canola oil
1 medium onion
1 large green pepper, chopped
1 lbs lean turkey (or extra lean ground beef)
1 tablespoon chili powder
1 (16oz) can corn (drained)
1 (28oz) can crushed tomatoes
1 (4 oz) can chopped green chilies
1 (4 oz) can sliced olives

Crust:
1 1/2 cups yellow cornmeal
1 teaspoon salt
1 quart fat-free milk
1/2 cup reduced fat shredded cheese (monterey jack, pepper jack, or mexican blend)

Directions:
  1. Preheat oven to 400º.
  2. Saute onions and pepper in a large skillet over medium heat till fragrant. Add meat, breaking it up, cooking until no longer pink. Drain liquid. Add chili powder, corn, chilies and olive. Simmer for 20 minutes. 
  3. Meanwhile, combine cornmeal, salt and milk in a 2 quart saucepan. Heat on medium-high and until thickened, stirring continuously. Spread cornmeal over top of meat and vegetables. Sprinkle with cheese. Place on baking sheet and back for 20-25 minutes, until top is golden.
Serves 8
Nutrition: Calories 369; Fat 8.3g; Cholesterol 42mg; Carb 49.5g; Protein 23.9g; Fiber 6.8g

Thursday, November 22, 2012

Pumpkin Macaroni & Cheese


Happy Thanksgiving to everyone! Right now my turkey is in the oven getting nice and golden brown. My stuffing is keeping warm and my cheesecake is chilling in the fridge. I am set for a huge Turkey Day dinner!
I thought this out of the box (not literally) mac and cheese dish would be a great addition to any fall meal. Pumpkin, as you all know, is my favorite and I was so excited when I realized you could put it in mac and cheese. When I told people I made this, their first reaction was, "That's weird." Really though, it was fantastic. The pumpkin was not to strong, but with the nutmeg and paprika seasoning you definitely get the great fall flavor. It was so cheesy and gooey. I loved it!

I hope everyone has a great Holiday and gets to spend time with the ones they love. :)


Pumpkin Macaroni & Cheese
adapted from gimmie some oven

Ingredients:
1 (12 oz) can 2% evaporated milk
1 (15 oz) can pumpkin puree
2 large eggs
1 1/2 teaspoons paprika
1 teaspoon salt
1/2 teaspoon pepper
1/4 teaspoon chili powder
1/8 teaspoon nutmeg
12 oz uncooked elbow pasta
2 1/4 cup reduced fat/part skim cheese (I used Italian blend)
1/4 cup panko bread cups

Directions:

  1. Preheat oven to 400. Spray a 2 qt baking dish with cooking spray.
  2. Bring a large pot of salted water to a boil, and cook the pasta until al dente. Drain the pasta, and then return back to pot. 
  3. While the pasta is cooking, in a separate bowl, whisk together the evaporate milk, pumpkin, eggs, paprika, chili powder, nutmeg, salt and pepper until combined. Once the pasta is cooked and drained, pour the evaporated milk mixture into the pot with the pasta and stir until combined. Continue cooking over medium-high heat, stirring occasionally, for about 3-4 minutes, or until sauce comes to a simmer and thickens.
  4. Remove from heat and stir in 2 cups of the cheese until melted and evenly-distributed.
  5. Pour into prepared baking dish and sprinkle top with bread crumbs and the remaining cheese. 
  6. Bake for 20-25 minutes, or until cheese is bubbling and the breadcrumbs are toasted. Remove from oven and serve immediately. 

Monday, November 19, 2012

Pumpkin Biscotti


I can not believe it has taken me this long to make Pumpkin Biscotti! Not only do I love biscotti, but I LOVE pumpkin. No need to fret anymore, because I have finally done what is right. These cookies were a great addition to my morning coffee. A hint of ginger and nutmeg, and a crunch from the pumpkin seeds. I took the white chocolate and just did a little drizzle. If you want to you are more than welcome to just dunk half of the cookie into the melted chocolate. As much as I love chocolate, white chocolate can be a little too rich for me.

These would be a great addition to Thanksgiving breakfast if you plan on a large family gathering. I know I would love it if someone had these sitting out waiting for me to enjoy. :)


The dough is very sticky so just work slowly to get it into the shape you desire.


Pumpkin Biscotti
dessertfortwo.com

Ingredients:
1 large egg
1/2 cup sugar
1/2 teaspoon baking powder
1/4 cup pumpkin puree
1/2 teaspoon cinnamon
1/4 teaspoon ground nutmeg
pinch of ginger
pinch of ground cloves
1/8 teaspoon salt
1/2 teaspoon vanilla
1 1/4 cups flour
3 tablespoons pepitas, lightly toasted
1 ounces white baking chocolate (optional)

Directions:
  1. Preheat oven to 350º and line a baking sheet with parchment paper.
  2. In a medium bowl, beat together with a whisk the egg, sugar, and baking powder. Beat vigorously until the mixture turns pale yellow and falls back in ribbons on itself when you lift out the whisk. 
  3. Next, add the pumpkin puree, cinnamon, nutmeg, ginger, cloves, salt and vanilla. Continue whisking, aerating the mixture. 
  4. Finally, sprinkle the flour on top and fold it in with a spatula. Fold in the pepitas last. 
  5. Shape the dough into a flat log about 3" wide and 8" longs, using wet fingertips. Bake for 40 minutes, or until a toothpick inserted comes out clean.
  6. Remove from the oven, turn the oven down to 300º and let rest for 15 minutes. Slice into 1/2" slices, place them back on the baking sheet and bake another 30 minutes, turning them over half-way. 
  7. Let cool completely on a wire rack. Melt chocolate in a microwave safe bowl at 30 second increments until melted and smooth. Transfer melted chocolate into a small ziplock back and snip a small corner of the bag. Pressing gently from the top drizzle the chocolate over the biscotti. Let cool and serve with your favorite hot beverage!
Makes 12 cookies.
Nutrition: (one cookie) Calories 104; Fat 2g; Protein 2g; Fiber 0g; Cholesterol 15mg; Carbs 20g

Saturday, November 10, 2012

Waist Friendly Butternut Squash Lasagna


Next to pumpkin, butternut squash has always been one of my favorite things. Every fall I look forward to making something new with this fantastic fall ingredient. I love butternut squash ravioli, but that is a bit time consuming, so I had to settle for something a little easier. Lasagna was a close second and I have no regrets. This is a perfect blend of fall flavors, and a great way to get everyone together for a chilly autumn meal. 


It may seem like a lot but it will wilt down. 

I should have put more lemon zest in but I didn't have enough lemons. 

Ooey Gooey cheesiness!! :)


Waist Friendly Butternut Squash Lasagna
singlegirlkitchen

Ingredients:
1 pound whole wheat lasagna noodles
2 to 2.5 pounds butternut squash (cut into 1 in cubes)
olive oil
salt and pepper to taste
4-5 ounces cremini mushrooms, washed and sliced
1 medium onion, chopped
3 cloves garlic, finely minced
1/4 cup white wine
1 cup milk, plus additional if needed
1 teaspoon grated nutmeg
1 tablespoon grated nutmeg
1 tablespoon lemon zest
1 teaspoon minced fresh thyme leaves, plus additional for garnish
1 1/2 cups shredded italian blend cheese

Directions:
  1. Heat the oven to 375ºF. Peel and seed the squash. Cut into 1-inch cubes and toss with 1 tablespoon olive oil and a generous amount of salt and pepper. Spread on a baking sheet and roast for 30-40 minutes or until extremely soft. 
  2. While squash roasts, bring a large pot of water to boil over high heat. Add the lasagna noodles and cooking according to directions on package. When cooked, drain and lay out on clean kitchen towels to dry. 
  3. Heat a drizzle of olive oil in a large saute pan. Turn the heat to medium-high, add onions and cook until tender and fragrant, add mushrooms and 1/4 cup white wine. When mushrooms and onions are tender, and most of the liquid absorbed, push the onions and mushrooms to the sides, turn the heat to medium, and add the garlic and spinach to the center of the pan. Cook until the spinach is wilted, just a few minutes. Turn off the heat and season the vegetables with salt and pepper.
  4. At this point the butternut squash should be out of the oven and cooled slightly. Scrape all the squash into a food processor or blender and add 1/2 cup milk, the nutmeg, lemon zest, and thyme. Puree, adding the remaining milk as you go, until smooth and creamy, but not too thin. (Think thin fruit smoothie) Add salt and pepper to taste.
  5. Lightly grease a 9x13 inch baking dish with olive oil. To assemble the lasagna, spoon about 1/4 of the butternut squash puree into the bottom of the prepared baking dish and spread thinly to coat the bottom. Place 1/4 of the noodles on top (four noodles) and then spread 1/3 of remaining sauce on noodles. Top with 1/2 of the cooked vegetables, and 1/2 cup cheese. Add another layer of noodles, then sauce, then the rest of the vegetables, and 1/2 cup cheese. Place the final layer of noodles over the vegetables and spread the last 1/3 of the sauce over the top. Sprinkle evenly with the remaining 1/2 cup cheese and a pinch of thyme leaves.
  6. Cover the lasagna with foil and back at 375ºF for 30 minutes. Remove the foil and continue to bake for 10 to 15 minutes or until the top is golden and the cheese is gooey. Remove from the oven and let stand uncovered for 5 to 10 minutes before slicing. 
*For leftovers you can cut individual servings, wrap in foil, and freeze in a large freezer bag. Then put straight into oven with foil!

Serves 6 to 8
Nutrition: Calories 233; Fat 7g; Protein 12g; Fiber 6g; Cholesterol 11mg; Carb 34g


Saturday, November 3, 2012

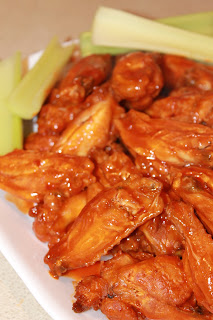
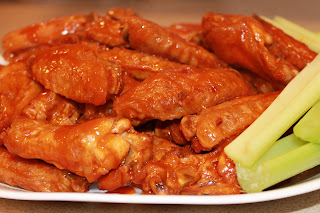
Crispy Baked Buffalo Wings


Tomorrow is Sunday and that means, FOOTBALL!! If you are planning a little gathering of friends, you definitely have to feed them these. I have made wings before, but I could not master the crispy skin when I baked them. Fried wings always gave that crispy skin I wanted, but with tons more calories. Then I found this beautiful method. Taking the time to boil the wings, then broil them is worth it! By seasoning the water, you get a great flavor throughout the meat. Then putting them under the broiler gives them that crispy skin that you could only get by frying...but that was before. No longer do you have to throw your wings in a vat of fatty oil. Just boil and broil. Super simple, and even more delicious!!

I later added a bit of Franks Buffalo Sauce. Great combination of flavors!


You can see the spices from the seasoned water. I think that step is so important, because it doesn't just help get the crispy skin, but gives a full flavor throughout the meat. *Also when broiling make sure to place the oven rack to the second to bottom rung. If the chicken is too close to the broiler you get burnt chicken. You don't want that!


I'm all about the sauce! Who needs ranch dressing or blue cheese when you can just dip it in extra sauce. :)
Crispy Buffalo Wings
adapted from food.com

Ingredients:
2 lbs chicken wings
1 tablespoons chili powder
2 tablespoons red pepper flakes
1 tablespoon salt
1/2 cup Louisiana hot sauce
1/2 cup buffalo sauce (Franks buffalo wing sauce works great)
2 tablespoons unsalted butter

Directions:
  1. Fill a large pot half way with water and then add the first 4 ingredients.
  2. Bring water mixture to a boil and then boil for 15 minutes.
  3. Transfer wings to a baking sheet coated with cooking spray. Place oven rack on second to bottom level. Broil wings for 15 minutes on each side. (For crispier wings, cook longer on each side, maybe 20 minutes per side.)
  4. While waiting for wings, combine sauces and butter in a microwave safe dish and cook in microwave for 2 minutes, or until melted. (For thicker sauce, cook longer.)
  5. When wings are done, toss them with 3/4 of sauce. Use all or use leftover sauce for dipping. 
Serves 4
Nutrition: (6 wings per servings) Calories 405; Fat 30; Carb 0; Cholesterol 119mg; Protein 30g; Fiber 0

Thursday, November 1, 2012

Baked Pumpkin Donut Holes


I am warning you all now, prepare for many pumpkin/squash recipes this fall. The second the winds start to chill and the leaves start to turn I crave pumpkin anything. This recipe came up and I couldn't help but make them. I know I am all about eating healthy, but there are times when I just want to indulge in something sweet and delicious. These are great for those times. :)


Baked Pumpkin Donut Holes
craving chronicles

Ingredients:
1 3/4 cups all-purpose flour
2 teaspoons baking powder
1/2 teaspoon salt
1/2 teaspoon cinnamon
1/2 teaspoon nutmeg
1/2 teaspoon allspice
1/8 teaspoon ground cloves
1/3 cup vegetable oil
1/2 cup brown sugar
1 egg
1 teaspoon vanilla extract
3/4 cup canned pumpkin puree (NOT pumpkin pie filling)
1/2 cup low-fat milk

Coating:
1/2 tablespoon cinnamon
2 tablespoons sugar

Direction:
  1. Preheat oven to 350º. Spray each up in a 24-in mini muffin tin with baking spray or butter generously.
  2. In a medium bowl, whisk together flour, baking powder, salt, and spices (through cloves). In a seperate, large bowl whisk together oil, brown sugar, egg, vanilla, pumpkin, and milk until smooth. Add dry ingredients to wet ingredients and mix until just combined, do not over mix!
  3. Divide batter evenly among muffin cups. Use a tablespoon measure to get uniform sizes. Bake at 350º for 10-12 minutes or until a toothpick comes out clean.
  4. Meanwhile, mix 1/2 tablespoon cinnamon and 2 tablespoons sugar in a small bowl.
  5. Remove muffins from oven and let cool until easy to handle. Roll donut holes in cinnamon and sugar mixture until just coated.*
*The coating was great and really gave the donut holes a sweet crust, but if you are looking for something lighter you can skip it. If you do decide to use the coating, do it on the day you decided to eat them, otherwise the coating tends to get a little moist. One thing I found though was that they were easier to coat when warm. 


LinkWithin

Related Posts Plugin for WordPress, Blogger...