Friday, November 25, 2011

Apple Cranberry Bread


I hope everyone's Thanksgiving was fantastic! This year I was in charge of the bird and I have to say, I didn't completely ruin it. I may have taken it out of the oven a bit early, but don't worry we continued to cook the pink parts and we didn't get food poisoning. So I have to give myself credit for doing a decent job for my first time roasting a turkey. We also had delicious mashed potatoes and yummy cranberry sauce. Mmm I wish it was yesterday all over again! 
Here is a delicious quick bread that I couldn't stop eating! Happy Holidays everyone!


Apple Cranberry Bread
tasteofhome Guilt Free Cooking


Ingredients:
2 eggs
3/4 cup sugar
2 tablespoons canola oil
1 1/2 cup all-purpose flour
1 1/2 teaspoons baking powder
1 teaspoon ground cinnamon
1/2 teaspoon baking soda
1/2 teaspoon salt
2 cups chopped peeled tart apples (about 2.5 small Granny Smith apples)
1 cup fresh or frozen cranberries
1/2 cup chopped walnuts

Directions:

  1. Preheat oven to 350°.
  2. In a mixing bowl, beat the eggs, sugar and oil. Combine flour, baking powder, cinnamon, baking soda and salt; add to the egg mixture just until combined (batter will be thick). Stir in the apples cranberries and walnuts.
  3. Transfer to an 8″x4″x2″ loaf pan coated with cooking spray. Bake at 350° for 60-65 minutes or until a toothpick inserted near the center comes out clean. Cool for 10 minutes before removing from pan to a wire rack to cool completely. 
Makes 1 loaf (16 slices)
Nutrition: (1 slice) Calories 140; Fat 5g; Cholesterol 27mg; Sodium 143mg; Carb 22g; Fiber 1g; Protein 3g

Friday, November 18, 2011

Roasted Butternut and Shallot Soup


Cooking is one of those things that help me relax and feel centered. Kind of like yoga. When I cook, I may look like I'm running around and feeling crazed; I'm really just in the zone letting my mind wander away from the stressful things in life. In the end I am able to sit, relax, and enjoy what I just created. I believe that is why I love cooking so much. I have never been good at painting, playing an instrument, or being crafty; but when I'm baking up a delicious bread loaf or blending up soup, I feel like Picasso or Salvador Dali! I know I sound like a crazy person, it's just how I feel.

A few weeks ago at work we had a Butternut Squash Bisque and I fell in love. From that day I have been dying to make soup. My biggest obstacle was that the two blenders I had were both broken. I was defeated by a little piece of plastic that didn't allow my Magic Bullet to work. So one day I searched all over the internet and found a store that sold that little rubber ring stopper for my other blender, that mysteriously disappeared of course. $1.08 later, I was on my way to the grocery store to buy the necessities for the soup I was craving.

Now, I have never made soup before and I was a little nervous about the outcome. The first spin in the blender didn't result in the consistency I wanted so I had to repeat that step, a couple of times. The next time I make soup I know what to do now. I love learning new things.

Enjoy this fabulous deliciously nutritious soup on a chilly autumn night!


Butternut squash is really hard to cut in half. As you can see my halves are no where near even!


Roasted Butternut Squash
Cookinglight Magazine - November 2006 Issue

Ingredients:
4 cups (1-inch) cubed peeled butternut squash (about 1.5 pounds)
 1 tablespoon olive oil
1/4 teaspoon salt
4 large shallots, peeled and halved
1 (1/2 inch) piece peeled fresh ginger, thinly sliced
2 1/2 cups fat-free, less-sodium chicken broth
2 tablespoons (1-inch) slices fresh chives
Cracked black pepper (optional)

Directions:
  1. Preheat oven to 375°
  2. Combine first 5 ingredients in a roasting pan or jelly-roll pan; toss well. Bake at 375° for 50 minutes or until tender, stirring occasionally. Cool for 10 minutes.
  3. Place half of squash mixture and half of broth in a blender. Remove center piece of blend lid (to allow steam to escape); secure blender lid on blender. Place a clean towel over opening in blender lid (to avoid splatters). Blend until smooth. Pour into a large saucepan. Repeat procedure with remaining squash mixture and broth. Cook over medium heat 5 minutes or until thoroughly heated. top with chives and pepper, if desired. 
Makes 6 servings (2/3 cup soup)
Nutrition: (per serving) Calories 112; Fat 2.5g; Protein 3.3g; Carb 22.4g; Fiber 3.6g; Cholesterol 0mg; Sodium 266mg

Monday, November 14, 2011

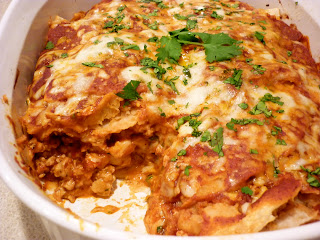
Turkey Enchiladas Casserole


I can't believe that a week from Thursday we will be putting a turkey in the oven! This year has gone by so fast. Next thing you know we'll be opening presents, welcoming in a New Year, hugging our Valentines, watching fireworks explode, picking out Halloween costumes...then there's that turkey again. Blows my mind how fast it really goes. Sometimes that is a good thing. This year has gone fast, but it seems so long. I am so thankful I started this blog. It really has kept me busy and motivated. I have also learned so much and I can't wait to try out all of these new recipes on my favorite person; who comes home next month. :)

This year I am making Thanksgiving dinner for the first time, and I'm nervous. I know it's just a dinner, but it's Thanksgiving dinner! One of the best days of the year, where we can stuff our faces and no one can judge you on how many calories you just consumed. My eating habits have changed completely in the last few years, and I am excited to try new Thanksgiving recipes that I was too scared to try before. Oh man, I am excited!

I know this recipe has nothing to do with Thanksgiving, but I was really craving enchiladas. As it turns out, I love casserole recipes. It's so easy; just cook it, throw it in a dish, and bake it. That simple. When I found this recipe I just knew I had to do it. If you have ever made enchiladas before, than you know how time consuming that can be. This recipe really takes no time at all, and it tastes just as good (if not better) than rolled up enchiladas. Don't believe me? You'll just have to try it out on your own! :)


Turkey Enchiladas Casserole
Sunset - September 2002


Ingredients: 
1 1/2 lbs ground lean turkey breast
1/2 cup chopped onion
1 tablespoon minced garlic
2 tablespoons minced fresh oregano leaves or 1 tablespoon dried
1/2 teaspoon ground cumin
1 teaspoon salad oil (vegetable oil)
1 can (29 oz) red enchilada sauce
Salt
12 corn tortillas (6in. wide)
2 cups shredded reduced-fat jack cheese (8 oz)
Chopped fresh cilantro

Directions:

  1. In a 5- to 6-quart pan over high heat, stir turkey, onion, garlic, oregano, and cumin in oil until turkey is crumbly and no longer pink, about 4 minutes. Stir in 1 cup enchilada sauce. Add salt to taste.
  2. Meanwhile, cut tortillas in half. Arrange a fourth of the halves evenly over the bottom of a shallow 3-quart casserole dish, overlapping to fit. Sprinkle a fourth of the cheese evenly over the tortillas, then top with a third of the turkey mixture and a fourth of the remaining enchilada sauce, spreading each level. Repeat to make two more layers of tortillas, cheese, turkey mixture, and sauce; top with another layer of tortillas and sauce, then cheese.
  3. Bake in a 425° regular or convection oven until cheese is melted and casserole is hot in the center, 18-20 minutes. Sprinkle with chopped cilantro.  
Makes 8-10 servings
Nutrition: (1 serving) Calories 249; Fat 5.7g; Protein 27g;  Carb 23g;  Fiber 1.7g;  Cholesterol 58mg; Sodium 1048mg

Thursday, November 10, 2011

Traditional Apple Pie


As much as I love baking I have never made a pie, until now! I was randomly craving pie one day so I went on an adventure to try apple pie for the first time. While I was studying the recipe I realized the cookbook I was using was from England. Metric system, caster sugar, vanilla essence...I did a little googling before buying ingredients. At first I didn't think anything of it, but halfway through mixing I realized I wouldn't be making that traditional American apple pie. I continued baking and it turned out delicious, but there are things that I would definitely do different. 

This time I went the lazy way and went with store bough pie crust. I'm sure I could have went all out, but I thought I would wait till I got a better recipe. One part of the recipe that stumped me was the "caster sugar" part. Never have I heard of caster sugar. After a bit of researching I found out that caster sugar was much finer than granulated sugar, but not as fine as powdered sugar. I wasn't sure if I would be able to find caster sugar in the store, so I thought I would make it myself. Sound impossible? I thought so too. Really, all you do is take granulated sugar and put it in a food processor or, if you are like me and don't have a food processor, your Magic Bullet. Pulse it until it is very fine, but before it gets too powdery. There you have it, your own homemade caster sugar! 

The pie crust was not pictured, because I forgot about it. Forgive me. :)
This was my first time making apple pie so I was scared to put too much of the filling in the pie crust, so I had some left over. I was wrong. Next time I am throwing everything in, even if I have a mountain of a pie in front of me!

Peeled, cored, and sliced. :)
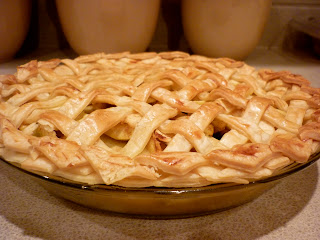
To making the lattice pattern take 5-7 strips of dough and lay them parallel across the top of the filling. Fold back every other strip and place another strip going the opposite way, lay the folded pieces back over the top. Repeat until you have something that likes the picture below!

There are so many ways to decorate an apple pie. I really wanted to try out the weaving technique. I also took the left over dough and cut out little leaves to put around the edge.  Next, I'll try out the two crust pie. Want some more ideas? Check out different decorating techniques here!
 
To prevent the edges from browning too fast place greased foil, or a "pie edge cover", around the edge of the pie. When there is about 15-10 minutes left remove.


Traditional Apple Pie
Martha Day: Complete Baking


Ingredients:
For filling:
2 lbs tart eating apples, such as Granny Smith; peeled, cored, and sliced
1 tbsp fresh lemon juice
1 tsp vanilla essence (extract)
4 oz (1/2 cup) caster sugar
1/2 tsp cinnamon
1 1/2 oz butter or margarine
1 egg yolk
2 tsp whipping cream

For pastry:
8 oz plain flour
1 tsp salt
6 oz lard or vegetable fat
4-5 tbsp iced water
1 tbsp quick-cooking tapioca

Direction:
  1. Preheat over to 450'.
  2. For the pastry, sift the flour and salt into a bowl. Using a pastry blender, cut in the fat until the mixture resembles coarse breadcrumbs.
  3. Sprinkle in the water, 1 tablespoon at a time, tossing lightly with your fingertips or with a fork until the pastry forms a ball.
  4. Divide the pastry in half and shape each half into a ball. On a lightly floured surface, roll out one of the balls into a circle about 12in in diameter.
  5. Use it to line a 9in pie tin, easing the dough in and being careful not to stretch it. Trim off the excess pastry and use for trimmings to decorate. Sprinkle the tapioca over the bottom of the pie shell.
  6. Roll out the remaining past to 1/8in thickness. With a sharp knife, cut out 8 large leaf-shapes. Cut the trimmings into small leaf shapes. Score the leaves with the back of the knife to make vines.
  7. In a bowl, toss the apples with the lemon juice, vanilla, sugar and cinnamon. Fill the pastry case with the apple mixture and dot with butter or margarine.
  8. Arrange the large pastry leaves in a decorative pattern on top. Decorate the edge with small leaves.
  9. Mix together the egg yolk and cream and brush other the leaves to glaze them. 
  10. Bake for 10 minutes, then reduce the heat to 350' and continue baking until the pastry is golden brown, 35-45 minutes. Let the pie cool in the tin, set on wire rack.

Saturday, November 5, 2011

Penne Sausage Bake


If you can't come up with any other name, Pasta Casserole. I love pasta casseroles. Well, I love pasta, but when you are able to just throw it all in a dish and bake it, that's when my heart grows. I was surprised by the amount of taste this dish had without a lot of spices. If you find the right kind of sausage, you can really add a lot of flavor with out dumping in tons of seasonings. 
Of course, while you are cooking you want to add a little salt and pepper to each layer. I added a bit of s&p to the onions and peppers, then again when I added the sausage. You can really tell the difference with just these two seasonings. That is a little trick I learned from a very well known TV chef. She is one of my favorites and loves to cook italian food! Just a little hint. :) I, of course, love my spicy so after I added the cheese I sprinkled on a little red pepper flakes.


This was super easy and quick. It also was eaten fast, so I will have to make this again!

Penne Sausage Bake
tasteofhome Guilt Free Cooking


Ingredients:
1 package (16 oz) uncooked penne pasta
1 medium green pepper, chopped
1 small onion, chopped
1 tablespoon olive oil
1 pound Italian Turkey sausage links, casings removed
3 cups fat-free meatless spaghetti sauce
1 1/2 cups (6 oz) shredded part-skim mozzarella cheese
1/4 cup grated Parmesan cheese

Direction:
  1. Cook pasta according to package direction; drain. In a large skillet, saute green pepper an onion in oil for 6-7 minutes. Add sausage; cook and stir until sausage is no longer pink. Drain. Stir in spaghetti sauce and pasta.
  2. Transfer to a 3-qt baking dish coated with cooking spray. Cover and bake at 350' for 15-20 minutes. Uncover; sprinkle with cheeses. Bake 5-10 minutes longer or until cheese is melted.
Makes 9 servings
Nutrition: (1 cup) Calories 276; Fat 11g; Chol 40mg; Sodium 948mg; Carb 25g; Fiber 1g; Protein 18g

Wednesday, November 2, 2011

Roasted Pumpkin Seeds


How was everyones halloween? Mine wasn't as exciting as I hoped but I spent time with family and stole candy from my niece. What? She couldn't possibly eat all of those chocolate bars by herself. So I helped her out. 
Well, now that halloween is over and those pumpkins have been carved; what are you going to do with all of those pumpkin seeds you have lying around? I bet I'm a bit late on this, but I'm sure if you happen to make your own pumpkin puree sometime soon you can definitely throw those seeds in the oven for a tasty nutritious snack.
Today, I watch Julie & Julia for the first time. I know, it's been out for a while, but I always see the good stuff after the hype has gone down. As I was watching it, I was dying to get back into the kitchen and cook. If you love food and want to become a better cook, this movie really does make you feel like you can cook anything. I have looked at recipes and thought, "There is no way I could do that." Well...now I'm going to start thinking a bit differently. I will look at a recipe and find a way to make it. I don't have a food processor...oh well, I'll use a blender. I don't have every pan size ever made...I'll convert the cooking times, or just go out and buy the pan since I'm awful at math. That food will be made. 

Take this recipe for example. I have never roasted pumpkin seeds, I have actually never eaten them. This year I just had an urge to cover those little seeds in spices and toast them. While I was looking at recipes online, I realized that there are many ways to flavor pumpkin seeds. So, instead of just following a recipe, I decided to use the flavors I like the most. Spicy and sweet. I had three pumpkins worth of seeds so I was able to do two different batches. One batch I covered in spices and worcestershire sauce, while the second swam in a bath of cinnamon and sugar. When they were done, I couldn't decide which one I liked the most! 


I went through my cupboard and brought down all of the seasonings  I liked the most.


Toasted Pumpkin Seeds

Ingredients:
Olive oil (2 tsp to 1.5 cups pumpkin seeds)
Most seasonings to taste.

Spicy:
Red pepper flakes
Cayenne pepper
Paprika 
Worcestershire sauce (2 tsp to 1.5 cups pumpkin seeds)

Sweet:
Cinnamon
Sugar
Nutmeg (just a dash)
Salt (just a dash)

Direction:
  1. Separate seeds from pulp. Lay out to dry.
  2. Preheat oven to 350'
  3. Cover dried and cleaned pumpkin seeds with olive oil and other desired flavors. 
  4. Lay pumpkin seeds in a single layer on a baking sheet and toast at 350' for twenty minutes. Occasionally stirring so all of the seeds toast evenly. 
There are so many ways to toast pumpkin seeds your possibilities are endless! If you want a natural taste, use a little olive oil and salt. Simple! Have fun!


LinkWithin

Related Posts Plugin for WordPress, Blogger...