Showing posts with label vegetarian. Show all posts
Monday, December 1, 2014
Fresh Pumpkin Puree
Okay, I know that fall is pretty much over; but if you are like me, then you will cook with pumpkin as long as you can. I discovered last year that fresh pumpkin is definitely worth the effort. Up until then, I had always used canned. Then I decided to take the plunge and try roasting a pumpkin and making my own puree. After all that I made myself a pumpkin pie. Oh. My. Goodness. That was the best pumpkin pie I had ever had (up till then of course). After that I have went the fresh pumpkin way if I could, or had the energy.
It's really easy converting a recipe from canned to fresh.
Labels:
baking,
cook,
dessert,
dinner,
freeze,
fruit,
make ahead,
pie,
recipes,
vegetables,
vegetarian
Wednesday, September 3, 2014
Fajita Bowl (can be vegetarian or not!!)
I am so excited for fall to start! The changing colors and brisk mornings. September to December has always been my favorite time of year. Not only for the weather, but for the food. The pumpkins, squash, and spices that come out around this time makes everything better. Just writing about it makes me ready to start pulling out my fall decoration and make my own pumpkin puree. Well, with only a couple weeks until the official first day of fall I can start planning! I might even do it a few days early. :)
This fajita bowl is a quick and flavorful way to curb any Mexican craving you may be having. I was on a huge craving at the time, but I didn't want to go out and eat a plate full of greasy rice and beans. So, I found this recipe. Low in calories and full of nutrition. The avocados have the good fats, the beans give out extra protein, and of course your daily serving of veggies. If you are not a meat eater, you can substitute large portabella mushrooms for the chicken. So no matter what your eating style is, or if you are on a specific diet, this recipe would be great for you!
Labels:
chicken,
cook,
dinner,
herbs,
recipes,
vegetables,
vegetarian
Sunday, August 3, 2014
Roasted Garlic Mashed Cauliflower
If I ever meet someone that says they don't like mashed potatoes, I wouldn't know how to act around them. Should they even be considered a person? Well, of course they should, but I would just think they are a really weird person. :)
I have heard of substituting cauliflower for potatoes in a mashed potato recipe before, it always sounded a little weird to me though. I knew it would be a great way to hide vegetables when you have people who doesn't like veggies. Now, I will honestly say that nothing is as good as the real thing, but this a fantastic healthy and quick version. Just like potatoes, you can season this mash with any flavors you and your family love. This recipe was a definite try for me, because I love roasted garlic!! Of course, I added a little dash of cayenne pepper, but you can do any seasoning you want. Rosemary, thyme, red pepper flakes, etc...this a blank canvas. A very healthy blank canvas!!
Labels:
cook,
dinner,
herbs,
side dish,
vegetables,
vegetarian
Sunday, March 23, 2014
Double Chocolate Souffle Torte with Raspberry Sauce
I like living here in Colorado, but there is one thing I would gladly move elsewhere for. Baking! So many times I crave to bake something, then I remember I live at high altitude and it will probably turn out hard as a rock. There are tons of articles and tips on how to alter a recipe to fit high altitude. Whenever I decide to take a recipe and alter it, I end up with many failed attempts and wasted ingredients. I hate wasting ingredients. I know baking is a lot like trial and error, but I can't help it!
A lot of times I forget I'm at high altitude. I start baking and when I pull whatever it is out of the oven it's dense and hard. That's when I get sad. I have even thrown out rock hard cupcakes before and just reverted to the high altitude alterations on a box. Yes shameful, but sometimes I just want to bake and I only have the patience to waste so many ingredients.
Labels:
baking,
cook,
dessert,
fruit,
make ahead,
pie,
recipes,
vegetarian
Wednesday, March 12, 2014
Cool Salmon & Couscous Salad with Snap Peas, Orange, & Mint
I have been tempted to try a lot of new things. Like a cold salmon couscous salad for example. I would have never even thought twice about making this. When I saw this recipe I was actually excited to try it. So much nutrition and flavor!
Now I had to cook my snap peas before mixing everything together. I am allergic to raw snap peas. I know weird. If they are cooked though I am all good. So just so I wasn't thrown any curve balls while eating I simply sauteed the snap peas for a few minutes. This dish is so flexible you could really do anything you want.
Labels:
cook,
dinner,
pasta,
recipes,
salad,
seafood,
vegetables,
vegetarian
Sunday, March 2, 2014
Flour-less Brownies with a Secret Ingredient!
This cold snowy day has been a great day for lighting a fire, reading, and baking brownies. Not just any brownies mind you. Brownies that are lower in calories and made with a "secret" ingredient. I put that in quotes cause it's really not much of a secret. I have heard about this recipe many times but I never believed that this specific ingredient could taste like brownies. Oh man was I wrong.
Labels:
baking,
cook,
dinner,
make ahead,
recipes,
vegetables,
vegetarian
Sunday, January 27, 2013
Old Fashioned Caramel Layer Cake
All week I have been unpacking and getting our new home in order. There are a few boxes I had in my old garage that I hadn't opened in two years; it was fun looking through those and seeing what I forgot I had. My husband said it was like opening up Christmas presents. Kind of felt that way for sure. It was nice to see things that I haven't seen in a while.
Like I said before because of this move, I haven't been able to make many new dishes, but that is changing soon. I have always wanted to try meal planning, and I spent the last few days looking up recipes, grocery shopping, and organizing my plans. I have a recipe planned for most of this next week, except for date night and leftover night. :) After a few weeks I will update you all on how it's going. Right now I'm starting with planning just a week ahead, then as I get used to it and get more organized I will upgrade to a couple weeks or even a month.
Okay, so are you ready for one of the most delicious cakes you will ever make in your life? If you love maple bars, I mean LOVE them, this cake is definitely for you. Even if you don't like maple bars, you still have to make this and eat it. Yes, it is a tad bit rich, but sometimes you need that in your life right? I made this cake for Christmas dinner and it was so good. I have saved this recipe and I am going to make this again, that is a promise!
Old Fashioned Caramel Layer Cake
CookingLight Cookbook
Ingredients:
Cake:
1 tablespoon all-purpose flour
1 1/2 cups granulated sugar
1/2 cup butter, softened
2 large eggs
1 large egg white
2 1/4 cups all-purpose flour
2 1/2 teaspoon baking powder
1/2 teaspoon salt
1 1/4 cups fat-free milk
2 teaspoons vanilla extract
Frosting:
1 cup packed dark brown sugar
1/2 cup evaporated fat-free milk
2 1/2 tablespoons butter
2 teaspoons light-colored corn syrup
Dash of salt
2 cups powdered sugar
2 1/2 teaspoons vanilla extract
Directions:
- Preheat oven to 350º.
- To prepare cake, coat 2 (9-inch) round cake pans with cooking spray; line bottoms with wax paper. Coat wax paper with cooking spray and dust with 1 tablespoon flour.
- Beat granulated sugar and 1/2 cup butter with a mixer at medium speed until well blended (about 5 minutes). Add eggs and egg white, 1 at a time, beating well after each addition. Lightly spoon 2 1/4 cups flour into dry measuring cups and level with a knife. Combine 2 1/4 cups flour, baking powder, and salt; stir well with a whisk. Add flour mixture to sugar mixture alternately with 1 1/4 cups milk, beginning and ending with flour mixture. Stir in 2 teaspoons vanilla.
- Pour batter into prepared pans; sharply tap pans once on counter to remove air bubbles. Bake at 350º for 25 minutes or until a wooden pick inserted in center comes out clean. Cool in pans 10 minutes on a wire rack; remove from pans. Peel off wax paper; cool completely on wire rack.
- To prepare frosting, combine brown sugar and next 4 ingredients in a saucepan. Bring to a boil over medium-high heat; stir constantly. Reduce heat, simmer 5 minutes, stirring occasionally. Remove from heat. Add powdered sugar and 2 1/2 teaspoons vanilla; beat at medium speed until smooth and slightly warm. Cool 2 to 3 minutes (frosting will be thin but thickens as it cools).
- Place 1 cake layer on a plate; spread with 1/2 cup frosting. Top with remaining cake layer. Frost top and sides of cake. Store loosely covered in refrigerator.
Makes 18 slices.
Nutrition: (1 slice) Calories 307; Fat 7.5g; Protein 3.8g; Carb 56.7g; Fiber 0.4g; Cholesterol 43mg
Labels:
baking,
cook,
dessert,
dinner,
make ahead,
recipes,
vegetarian
Wednesday, January 2, 2013
Butternut Sage Pasta
I have so many fall recipes that have yet to be posted! Please forgive me for being behind the seasons. Although dish isn't too far away. Butternut squash is still considered a winter ingredient and hey, it's still winter right? I am always the person that sees Christmas as winter and then after the New Year it's almost spring, even though it's still months away. :) It can't be spring when the temperature outside is in the 20's and there is ice on my car.
I really liked this dish. The flavor is very subtly so if you want to add a bit more spice, just sprinkle in a bit of paprika or cayenne pepper. I believe near the end of cooking I put in about a teaspoon of paprika and the flavor really took off. If you enjoy all the flavors of winter, you must try this!
Plus, you can see how easy this recipe is at the lack of pictures I took. Well, really I just forgot to take pictures because it was all done so fast. See how I justify my forgetfulness. :)
Butternut Sage Pasta
epicurious
Ingredients:
1 lb peeled and cubed butternut squash
1 small onion, diced
1/2 stick (1/4 cup) unsalted butter
1 tablespoon finely chopped fresh sage
1 1/2 cups water
3/4 teaspoon salt
1/2 teaspoon pepper
1 cup finely grated Parmigiano-Reggiano, if desired (Could be used in sauce or only as garnish. If using for garnish you won't need the full cup.)
1 lb rotini or penne pasta
Directions:
- Heat butter in a 5-6qt heavy pot over medium-high heat until foam subsides, then add sage and cook until fragrant, about 15 seconds. Add cubed butternut squash, diced onion, water, salt, and pepper and simmer, uncovered, stirring occasionally, until squash is very tender and water has reduced considerably, about 8-10 minutes.
- Meanwhile, cook pasta according to package directions, reserve 1 cup pasta water when ready to drain. When butternut squash is fork tender transfer mixture to a blender, or use an emersion blender if you have one. Blend until smooth.
- Toss cooked pasta with enough butternut squash sauce to coat evenly. If necessary, add a little bit of the reserved cooking liquid to thin it out. Garnish with cheese.
Serves 4-6
Labels:
cheese,
cook,
dinner,
herbs,
pasta,
recipes,
vegetables,
vegetarian
Saturday, December 29, 2012
Chocolate Chestnut Christmas Cookies
I know Christmas is over, but we are still in the holiday season. These cookies were just right for this time of year. I saw them on a cooking show a few weeks ago, and I instantly thought, "I have to make those." They looked simple, and so delicious! The only issue I had was finding roasted chestnuts. At some of the grocery stores around me they only have whole raw chestnuts, but I didn't want to go through the hassle of roasting them myself. Finally, after lost of searching online, I found an asian grocery store only a couple miles from me that sells them. If you are having trouble finding roasted chestnuts, look at your closest asian market, they will definitely be there. Just make sure you aren't using water chestnuts, they are NOT the same thing. :)
If you are worried about the flavor of the chestnuts, don't worry about it. I have never had chestnuts before, and that didn't matter because the chocolate is a little more powerful. One tip I would have is to roll out the pie dough thinner than how it is packaged. I just used the dough as is, no rolling out or anything. The filling was a little over powered by dough, so my suggestion would be to make the dough a bit thinner. You will also get a few more cookies as well.
Chocolate Chestnut Christmas Cookies
Giada De Laurentiis at Home
Ingredients:
1 cup steamed or roasted chestnuts, packaged about 6oz (NOT water chestnuts)
1/3 cup sugar
Pinch Kosher salt
2 tablespoons amber rum
2 teaspoons unsweetened cocoa powder
1/4 teaspoon cinnamon
1/4 teaspoons cloves
1/8 teaspoon ground ginger
1/4 cup mini semisweet chocolate chips
3 to 4 refrigerated pie crusts (2 store bought packages) at room temperature
1 large egg, beaten to blend
powdered sugar, for dusting
Directions:
- Position a rack in the center of the oven and preheat to 425º. Line a rimmed baking sheet with parchment paper.
- Blend the chestnuts, sugar and salt in a food processor until the chestnuts are finely ground. Add the rum, cocoa, cinnamon, cloves, and ginger. Blend until the filling is almost smooth, scraping down the sides a necessary. Add the chocolate chips and pulse until combined. (This can be made 2 days in advanced.)
- Working with 1 pie crust at a time, unroll the pie crusts on a work surface and, using a 3-inch round cutter, cut out 10 rounds from each crust. Brush the pastry rounds with the beaten egg to cover. Drop 1 generous teaspoon of the filling into the center of each round. Fold half of the dough over the filling and seal to make a half-circle shape. Brush the top of the dough with the beaten egg. Place on the prepared baking sheet and bake until golden brown and crisp, 15-17 minutes.
- Transfer to a wire rack and cool to room temperature. Dust with powdered sugar and serve.
Makes approx. 30 or more cookies.
Labels:
baking,
cook,
dessert,
make ahead,
pie,
recipes,
snacks,
vegetarian
Thursday, December 13, 2012
Skinny Baked Jalapeno Poppers
I really suck at this posting thing huh?! I didn't realize how long it's been since I last posted. Now that we are really close to my husband coming home, I stopped working and will be spending all my new free time packing. Hopefully I can also step it up on the postings. :)
I pulled out this recipe when we were gearing up for a football game. We didn't want a huge meal to worry about, only things we could pick up with our fingers and eat while jumping around screaming at the tv. These were great for just that. Plus they are much healthier for you than normal Jalapeno Poppers. No frying. No fatty cream. Just healthy delicious ingredients. I even had a skeptic try them and say they were just as good as the fried version. Now that's a gold star for healthy food!!
Skinny Baked Jalapeno Poppers
adapted from prevention rd
Ingredients:
10 jalapeno peppers, sliced in half lengthwise
5 oz light cream cheese
5 medium scallions, green part only, sliced
2 oz shredded low fat sharp cheddar
1/2 cup egg beaters or egg whites, beaten
3/4 cup panko crumbs
1/8 teaspoon paprika
1/8 teaspoon chili powder
salt and pepper
Directions:
- Preheat oven to 350º. Cut peppers in half lengthwise and scoop out the seeds and membrane.
- Combine cream cheese, cheddar, and scallions in a medium bowl.
- Combine panko, paprika, chili powder, salt and pepper in a shallow bowl.
- Fill peppers with cheese filling. Dip filled peppers in egg beaters, then into panko mixture, using a spoon to make sure all the seasonal doesn't fall to the bottom of the bowl.
- Spray a baking sheet with non-stick cooking spray or line with parchment paper. Line up filled peppers on sheet and lightly spray the peppers with a bit of cooking spray.
- Bake in the oven for about 20-25 minutes, until golden and cheese is melty. Remove from oven and serve immediately.
Makes 20 poppers.
Nutrition: (per popper) Calories 41, Fat 2.3g, Cholesterol 4mg, Carb 2.8g, Fiber 0.4g; Protein 2.5g
Labels:
baking,
cheese,
cook,
recipes,
snacks,
vegetables,
vegetarian
Thursday, November 22, 2012
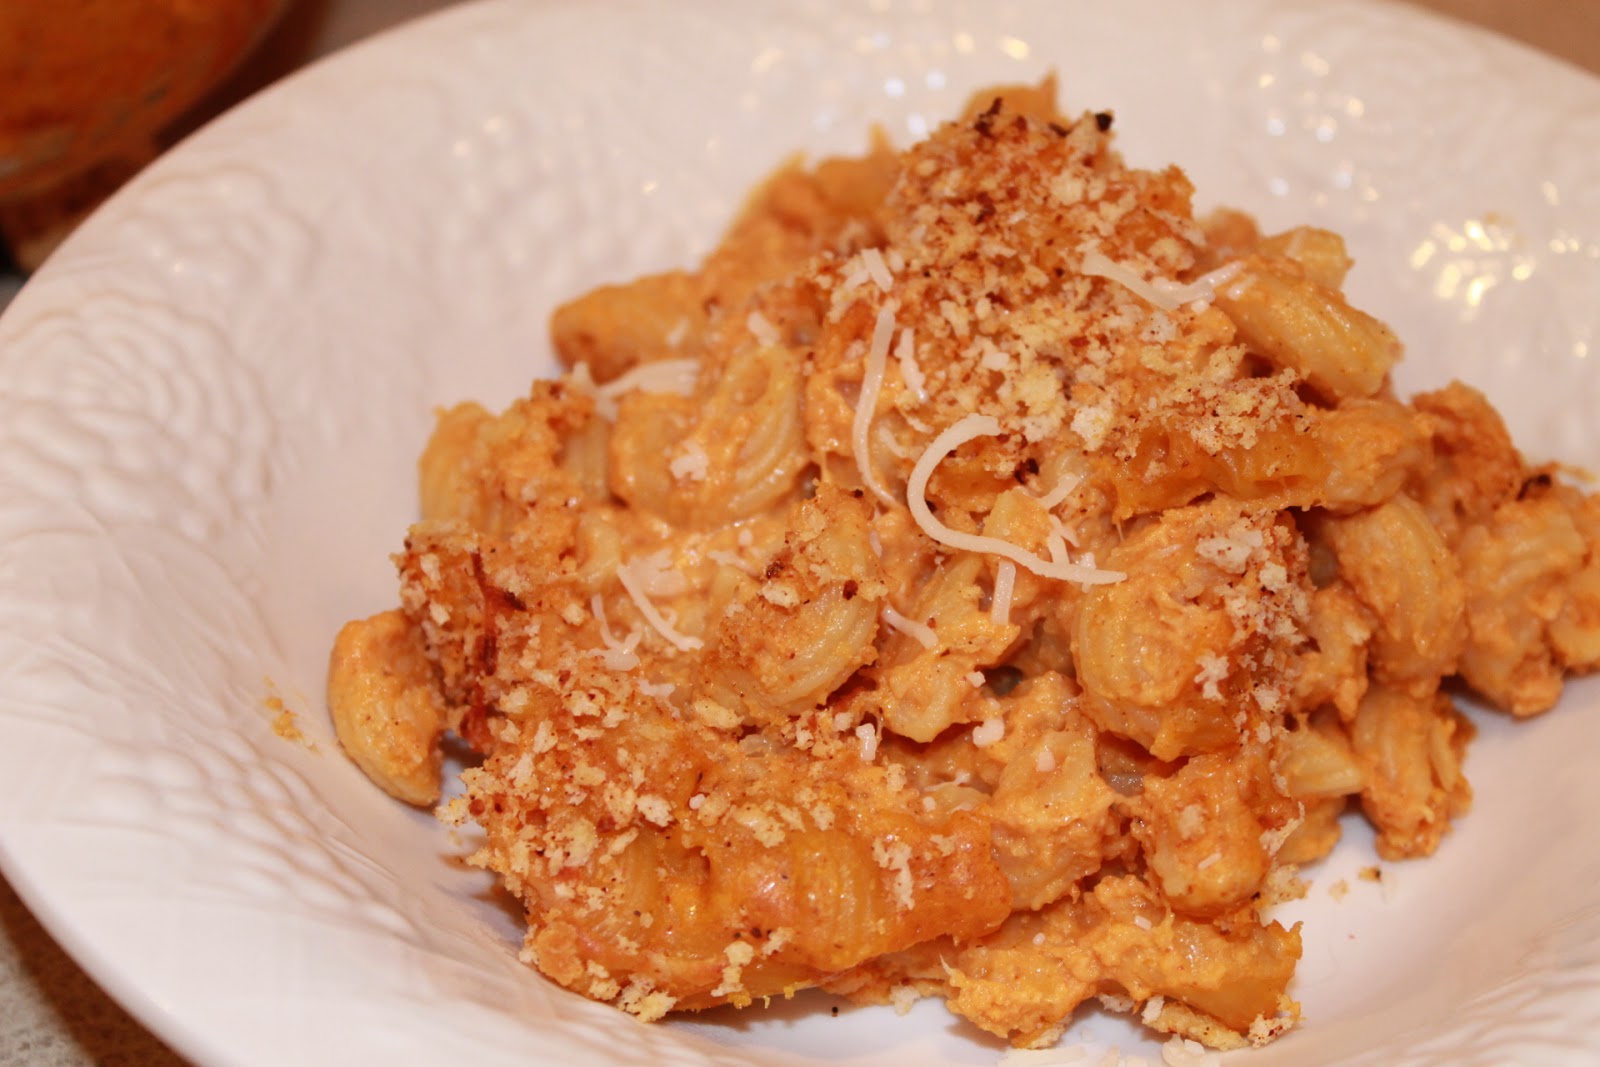
Pumpkin Macaroni & Cheese
Happy Thanksgiving to everyone! Right now my turkey is in the oven getting nice and golden brown. My stuffing is keeping warm and my cheesecake is chilling in the fridge. I am set for a huge Turkey Day dinner!
I thought this out of the box (not literally) mac and cheese dish would be a great addition to any fall meal. Pumpkin, as you all know, is my favorite and I was so excited when I realized you could put it in mac and cheese. When I told people I made this, their first reaction was, "That's weird." Really though, it was fantastic. The pumpkin was not to strong, but with the nutmeg and paprika seasoning you definitely get the great fall flavor. It was so cheesy and gooey. I loved it!
I hope everyone has a great Holiday and gets to spend time with the ones they love. :)
Pumpkin Macaroni & Cheese
adapted from gimmie some oven
Ingredients:
1 (12 oz) can 2% evaporated milk
1 (15 oz) can pumpkin puree
2 large eggs
1 1/2 teaspoons paprika
1 teaspoon salt
1/2 teaspoon pepper
1/4 teaspoon chili powder
1/8 teaspoon nutmeg
12 oz uncooked elbow pasta
2 1/4 cup reduced fat/part skim cheese (I used Italian blend)
1/4 cup panko bread cups
Directions:
- Preheat oven to 400. Spray a 2 qt baking dish with cooking spray.
- Bring a large pot of salted water to a boil, and cook the pasta until al dente. Drain the pasta, and then return back to pot.
- While the pasta is cooking, in a separate bowl, whisk together the evaporate milk, pumpkin, eggs, paprika, chili powder, nutmeg, salt and pepper until combined. Once the pasta is cooked and drained, pour the evaporated milk mixture into the pot with the pasta and stir until combined. Continue cooking over medium-high heat, stirring occasionally, for about 3-4 minutes, or until sauce comes to a simmer and thickens.
- Remove from heat and stir in 2 cups of the cheese until melted and evenly-distributed.
- Pour into prepared baking dish and sprinkle top with bread crumbs and the remaining cheese.
- Bake for 20-25 minutes, or until cheese is bubbling and the breadcrumbs are toasted. Remove from oven and serve immediately.
Saturday, November 10, 2012
Waist Friendly Butternut Squash Lasagna
Next to pumpkin, butternut squash has always been one of my favorite things. Every fall I look forward to making something new with this fantastic fall ingredient. I love butternut squash ravioli, but that is a bit time consuming, so I had to settle for something a little easier. Lasagna was a close second and I have no regrets. This is a perfect blend of fall flavors, and a great way to get everyone together for a chilly autumn meal.
| It may seem like a lot but it will wilt down. |
| I should have put more lemon zest in but I didn't have enough lemons. |
| Ooey Gooey cheesiness!! :) |
Waist Friendly Butternut Squash Lasagna
singlegirlkitchen
Ingredients:
1 pound whole wheat lasagna noodles
2 to 2.5 pounds butternut squash (cut into 1 in cubes)
olive oil
salt and pepper to taste
4-5 ounces cremini mushrooms, washed and sliced
1 medium onion, chopped
3 cloves garlic, finely minced
1/4 cup white wine
1 cup milk, plus additional if needed
1 teaspoon grated nutmeg
1 tablespoon grated nutmeg
1 tablespoon lemon zest
1 teaspoon minced fresh thyme leaves, plus additional for garnish
1 1/2 cups shredded italian blend cheese
Directions:
- Heat the oven to 375ºF. Peel and seed the squash. Cut into 1-inch cubes and toss with 1 tablespoon olive oil and a generous amount of salt and pepper. Spread on a baking sheet and roast for 30-40 minutes or until extremely soft.
- While squash roasts, bring a large pot of water to boil over high heat. Add the lasagna noodles and cooking according to directions on package. When cooked, drain and lay out on clean kitchen towels to dry.
- Heat a drizzle of olive oil in a large saute pan. Turn the heat to medium-high, add onions and cook until tender and fragrant, add mushrooms and 1/4 cup white wine. When mushrooms and onions are tender, and most of the liquid absorbed, push the onions and mushrooms to the sides, turn the heat to medium, and add the garlic and spinach to the center of the pan. Cook until the spinach is wilted, just a few minutes. Turn off the heat and season the vegetables with salt and pepper.
- At this point the butternut squash should be out of the oven and cooled slightly. Scrape all the squash into a food processor or blender and add 1/2 cup milk, the nutmeg, lemon zest, and thyme. Puree, adding the remaining milk as you go, until smooth and creamy, but not too thin. (Think thin fruit smoothie) Add salt and pepper to taste.
- Lightly grease a 9x13 inch baking dish with olive oil. To assemble the lasagna, spoon about 1/4 of the butternut squash puree into the bottom of the prepared baking dish and spread thinly to coat the bottom. Place 1/4 of the noodles on top (four noodles) and then spread 1/3 of remaining sauce on noodles. Top with 1/2 of the cooked vegetables, and 1/2 cup cheese. Add another layer of noodles, then sauce, then the rest of the vegetables, and 1/2 cup cheese. Place the final layer of noodles over the vegetables and spread the last 1/3 of the sauce over the top. Sprinkle evenly with the remaining 1/2 cup cheese and a pinch of thyme leaves.
- Cover the lasagna with foil and back at 375ºF for 30 minutes. Remove the foil and continue to bake for 10 to 15 minutes or until the top is golden and the cheese is gooey. Remove from the oven and let stand uncovered for 5 to 10 minutes before slicing.
*For leftovers you can cut individual servings, wrap in foil, and freeze in a large freezer bag. Then put straight into oven with foil!
Serves 6 to 8
Nutrition: Calories 233; Fat 7g; Protein 12g; Fiber 6g; Cholesterol 11mg; Carb 34g
Labels:
baking,
cheese,
cook,
dinner,
pasta,
recipes,
spinach,
vegetables,
vegetarian
Subscribe to:
Posts (Atom)